|
|
In previous posts in this series, we’ve looked at logging in a variety of languages. In addition to looking at Java and Python, we’ve explored PHP and the Laravel framework.
Today we’ll look at another PHP framework: CodeIgniter. With this guide, you can get up and running with logging in your application quickly and confidently.

Why Is Logging Important?
Have you found yourself in any of these situations recently? Your pager goes off at 2 AM, or you’ve just received an email from a confused client—your application has stopped working, and they want it fixed now.
Ideally, you’ve received a support request that clearly describes the problem. Or, possibly, you’ve discovered a problem yourself. More often than not, however, you have a vague description of a problem and not much else to go on.
As a bug detector and fixer, it’s up to you to solve the case. And logs are an invaluable tool to provide you with the clues you need.
Logs are beneficial to the developers, the security team, and end-users. With a good set of logs, you can move quickly and confidently. Rather than guess at a problem, you can intelligently diagnose it and generate lasting fixes quickly. Consequently, if it’s 2 AM, you can get back to sleep before your morning alarm goes off for real.
What Is CodeIgniter?
CodeIgniter is a powerful PHP framework that has a very small footprint.
How small? It comes in at under 2MB for both the framework and the user guide.
You can use this speedy, lightweight framework to get fully functional web applications up and running quickly. CodeIgniter focuses on strong security and simple solutions. So there’s very little configuration required, as most of the development is carried out using conventions.
Using this framework, you can have high-performing apps running—even in shared hosting environments.
Spinning up a Basic CodeIgniter Project
I want to be able to show you CodeIgniter logging in practice. So, I’m going to show you how to set up a simple project with CodeIgniter. If you want to follow along, then here’s what I did:
- Download the ZIP file from the CodeIgniter website. I’m going to use version 4 for my example, but feel free to try out version 3.
- Run a local PHP server. You can do this from the command line running php -S localhost:5000 in your CodeIgniter directory.
- Navigate to localhost:5000 in your web browser, and you’ll see the CodeIgniter landing page.

Creating Our First Log Message
One of the excellent things about CodeIgniter is that it takes very little to get useful logs up and running. The built-in function is log_message(), a function that takes two parameters: the error level and the message.
Open up the Home controller in app/Controllers/Home.php. In the index function, before the return call, add the following code:
  $some_var = '';
  if ($some_var == '')
    {
          log_message(1, 'Some variable is an empty string.');
    }
This snippet sets a variable, checks that it has been set as expected, and then sends a log message if that condition is met.
This is obviously not a message you would leave in your production code, but you can use this log_message command anywhere in your PHP code to raise an error. This allows for specific elements of your application’s code to raise context-specific errors.
Once you’ve added the code, refresh the browser you opened with the welcome page, and this code will execute.
Well done! We’ve sent our first log message. Now we have to find it.
Navigate to /writable/logs in the root of the project directory, and you should see a new file with today’s date. Open up the file, and you’ll see the log message with a logging level and a time-stamp. Woohoo! We’ve now logged and retrieved our first logging message.
Logging Levels
When you use the log_message function, the first parameter to pass is the error level. But what are the different log levels? CodeIgniter follows the PHP RFC 5424 definition of log levels. There are eight different levels:
- Emergency: The system is unusable. This is the error level I used for our example above. Hopefully, you agree with me that logging every error at this level is probably inappropriate.
- Alert: Action must be taken immediately. This might be that the website is down, the database is unreachable, or an essential service is offline.
- Critical: Some critical component is missing, or an unexpected exception has occurred.
- Error: This level indicates a runtime error that doesn’t need immediate action but should be logged.
- Warning: These are warnings or exceptions raised by your application that may not be errors. This may include deprecation warnings or poor use of an API.
- Notice: This indicates normal but significant events in your application.
- Info: These are interesting events in your application. For example, this could be a user logging in or a list of SQL queries that are executed.
- Debug: Debug shows detailed debugging information. This is the lowest and most detailed level of logging.
When you’re raising a log message, you should try to decide which error category to send. This is especially important when you’re sharing your code with other people. And even when you’re just writing code that you will maintain and support, using these log levels when using the log_message function will help you effectively respond to the messages.
Configuration
Now that you’ve raised your first log message and are up to speed with log levels, let’s look at the configuration. As I mentioned earlier, there isn’t very much to configure with CodeIgniter, which is great.
CodeIgniter keeps all of the configuration for your application in one directory with clearly named files. If you look in the directory app/Config, you’ll see the file Logger.php. As you’ve probably guessed, this is where you store all of the configuration for your logging needs.
Threshold
The first variable that’s declared and set is $threshold. This value determines which levels will be logged across your application. The most straightforward way to use this variable is to set the minimum level with a single integer. Every error at this level and more serious levels will now be logged.
public $threshold = 3;
Now, every error that is raised at level 3 or higher will be logged. In this case, that would be critical, alert, and emergency. Alternatively, you can specify which levels that you want to capture:
public $threshold = [3,5];
This would capture error messages with critical and warning error levels.
Path
The $path variable is used to declare the directory where logs are saved to. By default, this is an empty string. Earlier, when we discovered the log files in /writeable/logs, this was a consequence of this setting. If you’d like the files to be stored elsewhere, you can set that at this point.
Date Format
Next is the $dateFormat variable, which has the date associated with the log entry. This follows the general PHP date conventions. You can find a full list of the PHP date conventions in the PHP documentation. Having a consistent log pattern will make your logs easier to parse.
Handlers
Finally, handlers are defined in the configuration file. A handler is a special class that takes the log message and handles it in a specific, developer-defined way. By default, CodeIgniter comes with two handlers and writes all messages to the first.
First up is the FileHandler.
Unsurprisingly, this is the handler that will write to files. The default configuration has various options defined that you can safely change, add, or adapt at this point in the configuration. You can define which error levels this handler will deal with, where it will write to, what file extension it will use, and the file permissions used. These are the settings that will be used when the log file is created.
It’s also possible to have multiple FileHandler classes defined here. For example, you could have a separate or concurrent FileHandler that only collects emergency-level messages to a specific directory.
The second handler that CodeIgniter provides is the ChomeHandler.
By default, this block of code is commented out. When uncommented, this handler would immediately post these messages to Chrome. You’ll need to have the relevant ChromeLogger extension installed, but otherwise, this works as expected. The only configuration required here is the level of error that this handler will deal with.
Adding Context to Log Messages
So far, we’ve sent our first log message and configured our logger to our needs.
Up till now, we’ve only been sending static messages to our log files. We haven’t been giving a lot of context to our errors, which will make solving any problems more challenging than it needs to be. You might want to log the current user name, IP address, or the contents of the POST variables associated with the error.
Thankfully, you can easily add context to your errors by using placeholders.
You wrap each placeholder in curly braces. Consequently, when there are placeholders present, the log_message function requires a third parameter. This parameter is a keyed array with the keys set to the placeholders and the values set to the corresponding value.
// Generates a message like: User 123 logged into the system from 127.0.0.1
$info = [
        'id' => $user->id,
        'ip_address' => $this->request->ip_address()
];

log_message('info', 'User {id} logged into the system from {ip_address}', $info);
If you wanted to log the value of an exception or an error, you can use the value of exception and the value as the message itself.
try
{
        ... Whoops! Something has gone wrong.
}
catch (\Exception $e)
{
        log_message('error', '[ERROR] {exception}', ['exception' => $e]);
}
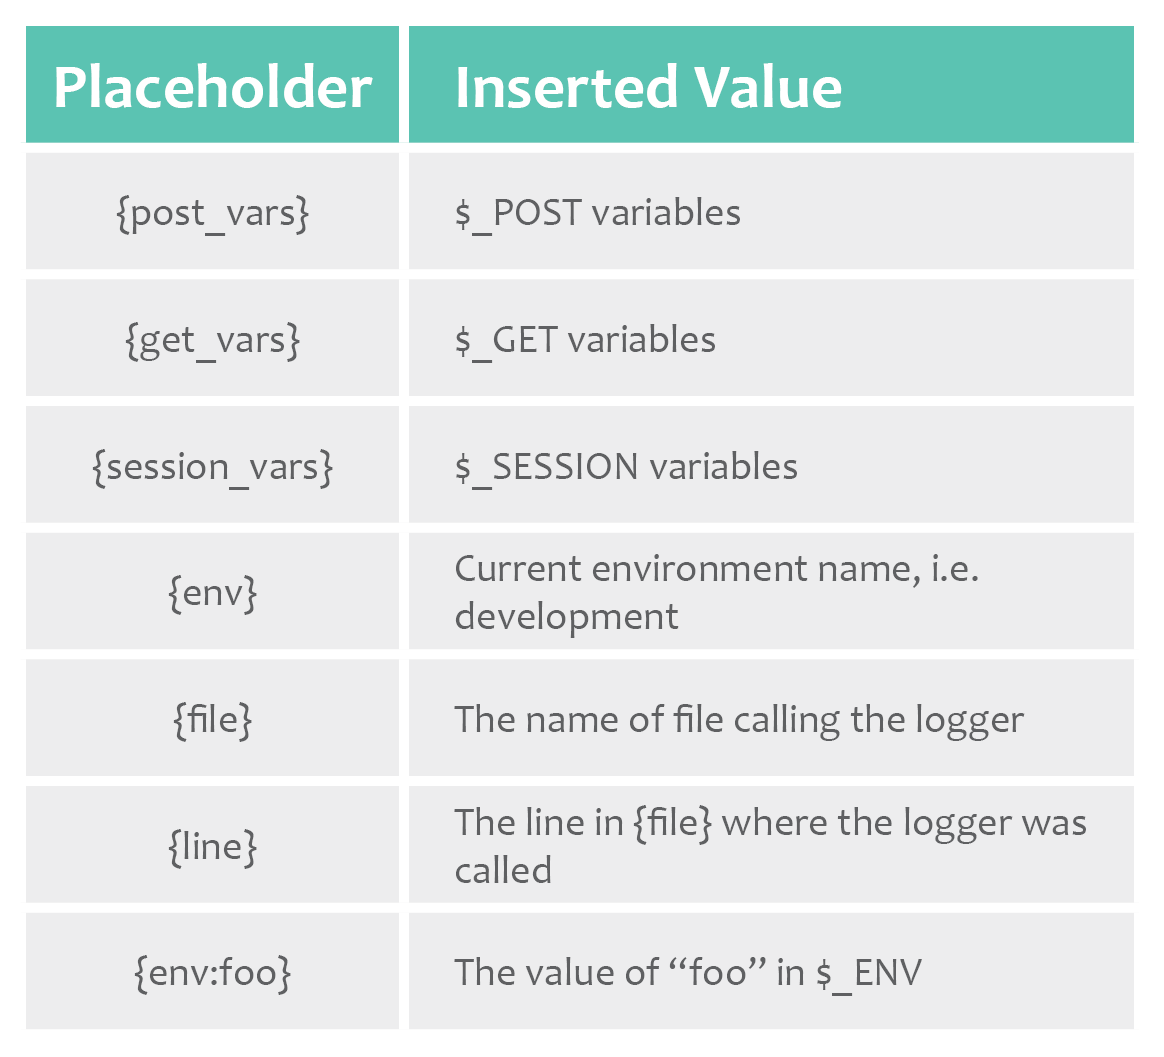
Interestingly, CodeIgniter also provides some default placeholders that will be expanded automatically based on the context of the error. Here’s a list of the values as found in the documentation:
Using Third-Party Logger Libraries
If you’re not happy with the logging capabilities CodeIgniter provides, you can use it with alternative, third-party logger libraries. Specifically, you can configure any third-party library as long as it extends from either PSRLogLoggerInterface and is PSR3 compatible.
In previous PHP logging articles, we’ve called out Monolog as a comprehensive and helpful library. You could configure your application to use this library or roll your own custom logger if you fancy.
Basically, you select the library that’s going to handle your logging and announce to CodeIgniter where to find it. If you’re not using Composer, the PHP package manager, to deal with your dependencies, CodeIgniter provides an autoloader. Open up the /app/Config/Autoload.php file and add your library there. Next, modify /app/Config/Services.php to point the logger alias to your new class name. That’s it!
Subsequently, your custom library will handle any error raised by the log_message function.
Collecting Logs in Production
While developing your application, referring to log files is an essential tool in identifying and fixing bugs.
In production, when an error is reported, it’s not efficient to log in to your web server and download the log files. This can be a time-consuming process, which may involve using secure file transport (SFTP) or secure file copy (SCP) to retrieve the files from the server.
Alternately, you may be logging in directly to your server to find the logs and assess the problem in situ. But this can impact the performance of your application, as your diagnostics are using the same system resources as the application
It’s much better to have the web server regularly upload the log files to a cloud-based logging service. Scalyr provides an amazing service that keeps and parses logs. Then, as you hunt down the cause of the error, you have a more detailed and complete toolset to help you. The system is really simple to use and comes with a powerful querying syntax that allows you to combine logs to get fuller, more detailed answers.
Sending Errors by Email
As I’ve mentioned, there are any number of log handlers you can implement. In my own practice, alongside tools like Scalyr, I find email handlers to be invaluable. So, I thought I’d finish this post with such a handler that you could use for inspiration:
<?php

/**
 * Email handler
 */

namespace MyApplication\Log\Handlers;
/**
 * Log error messages to file system
 */
class EmailHandler extends BaseHandler implements HandlerInterface
{
  /**
   * Constructor
   *
   * @param array $config
   */
  public function __construct(array $config = [])
  {
    parent::__construct($config);

    $this->email_address = $config['email_address'] ?? '[email protected]';
    $this->subject = $config['subject'] ?? 'An error has occured';
    $this->from = $config['sent_from'] ?? 'Your CodeIgniter Application <[email protected]>';
  }

        /**
	 * Handles logging the message.
	 * If the handler returns false, then execution of handlers
	 * will stop. Any handlers that have not run, yet, will not
	 * be run.
	 *
	 * @param $level
	 * @param $message
	 *
	 * @return boolean
	 * @throws \Exception
	 */
    public function handle($level, $message): bool
    {
    $msg = '';
    // Instantiating DateTime with microseconds appended to initial date is needed for proper support of this format
    if (strpos($this->dateFormat, 'u') !== false)
    {
      $microtime_full  = microtime(true);
      $microtime_short = sprintf('%06d', ($microtime_full - floor($microtime_full)) * 1000000);
      $date            = new \DateTime(date('Y-m-d H:i:s.' . $microtime_short, $microtime_full));
      $date            = $date->format($this->dateFormat);
    }
    else
    {
      $date = date($this->dateFormat);
    }
    $msg .= strtoupper($level) . ' - ' . $date . ' --> ' . $message . "\n";

    $to = $this->email_address;
    $subject = $this->subject;
    $headers = 'From:' . $this->from  . '\r\n';
    $headers .= 'Content-type: text/plain; charset=utf-8\r\n';
    mail($to, $subject, $msg, $headers);
  }
}
This handler extends the BaseHandler that comes with CodeIgniter. In the constructor method, I’m collecting some values from the configuration file and setting defaults if they’re not present.
The handle method is where all of the logic is occurring. Here, we construct the email message, add the subject and the correct headers, and then send the email. In production, this handler should either add this email to a queue or only be used for emergency-level log messages. Otherwise, the performance impact is likely to be too great.
Before you can use this handler, you need to add it to the /app/config/Autoload.php. In the classmap array, add your handler class as a key and the path to the file as the value. Finally, add the handler along with configuration in the handler array in /app/config/Logger.php.
I hope this code provides inspiration for your own handlers. You shouldn’t use this in production without further testing. You can write your own handlers for Slack, Trello, or other services to log your errors and assign someone to analyze and fix them quickly.
Logging Off
Logging is a vital tool for all developers. In this post, I’ve provided some pointers to help you get up and running with CodeIgniter logging.
If this is only the start of your journey with logging, I hope that implementing these strategies will make your development and debugging process smoother and more enjoyable. The less time you spend locating an error, the more time you can spend solving more interesting problems, like why the error is occurring.
If you’d like to read more about logging in PHP, I recommend you check out these posts about logging with PHP and Laravel. These articles go into more detail on the Monolog library I mentioned earlier and share some helpful PHP conventions and strategies for logging in development and production.