|
|
Our “getting started” series has covered so much ground that we’ve already compiled two different ebooks from it. But we’re not finished yet! It’s time to discuss logging with Python’s Flask framework!
Flask is a microframework for building web applications. It’s best known for its simple RESTful request routing. But it also includes a built-in development server, integrated unit tests, and excellent documentation.
I’ll start with an example of logging in Flask. Then I’ll talk about why logging matters and how it affects your application. Finally, I’ll move on to using the Python logging module, which is what Flask recommends as a best practice. I’ll explain how proper logging improves your ability to track down problems and watch your app.

The Simplest Flask Logging That Could Possibly Work
For this tutorial, I’m using JetBrain’s PyCharm IDE. If you don’t already have it installed, you can download a free version here. Once you have PyCharm installed, open it.
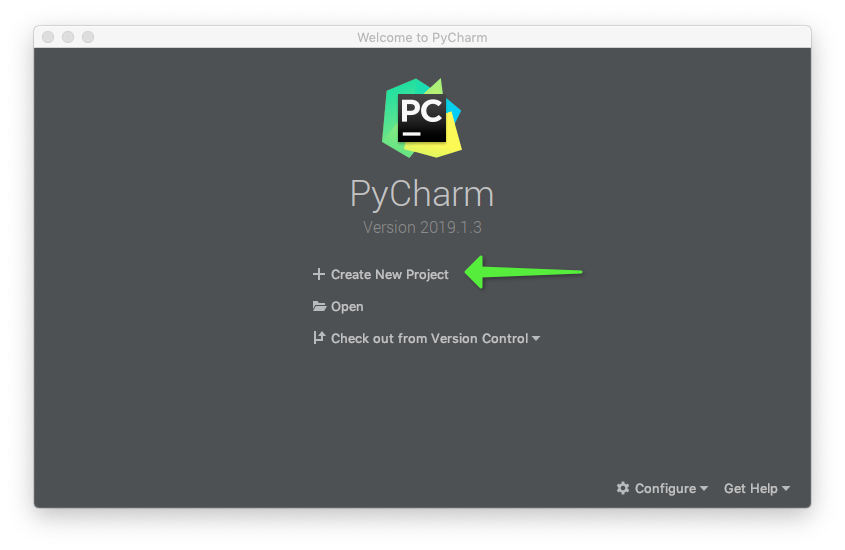
Click on the Create New Project option.
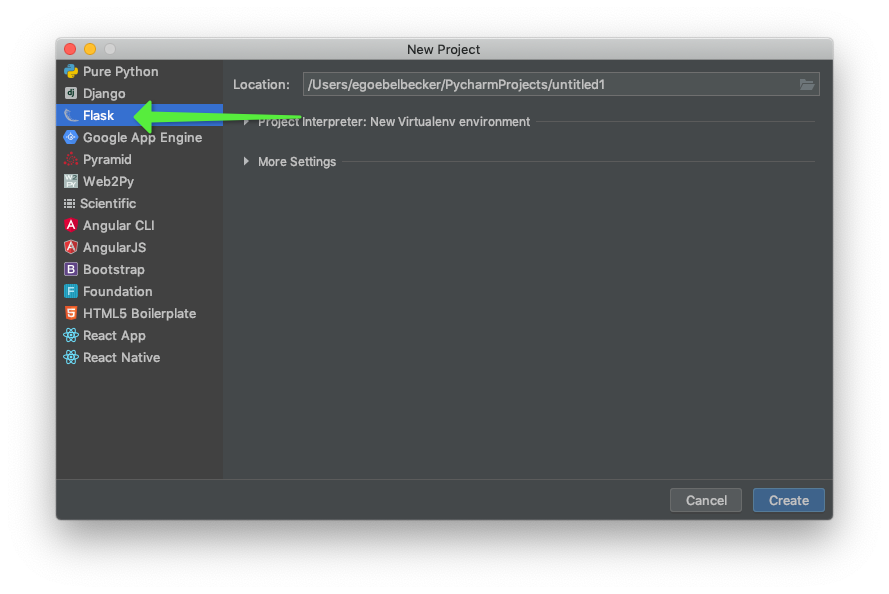
One of the reasons I selected Pycharm for this tutorial is that it sets up a virtual environment with Flask for you. Click on Flask in the left-hand menu. Then, give your project a name and take a look at the project defaults.
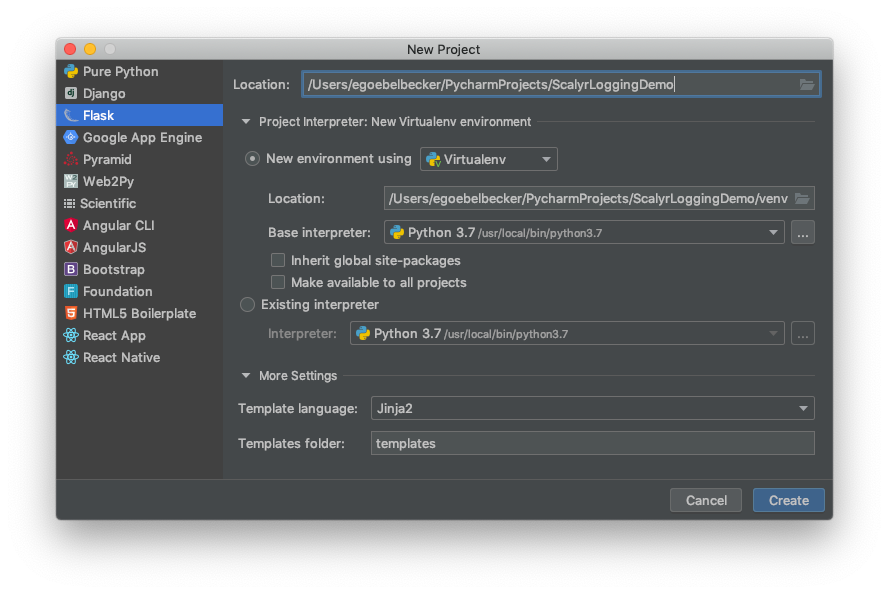
Pycharm will set up an environment with Python 3.7 for you. It’ll also install Jinja2 as a template language, but you won’t need it for this project.
Now, click the create button, and Pycharm will open your new project.
Pycharm supplies the main function with a single route already defined.
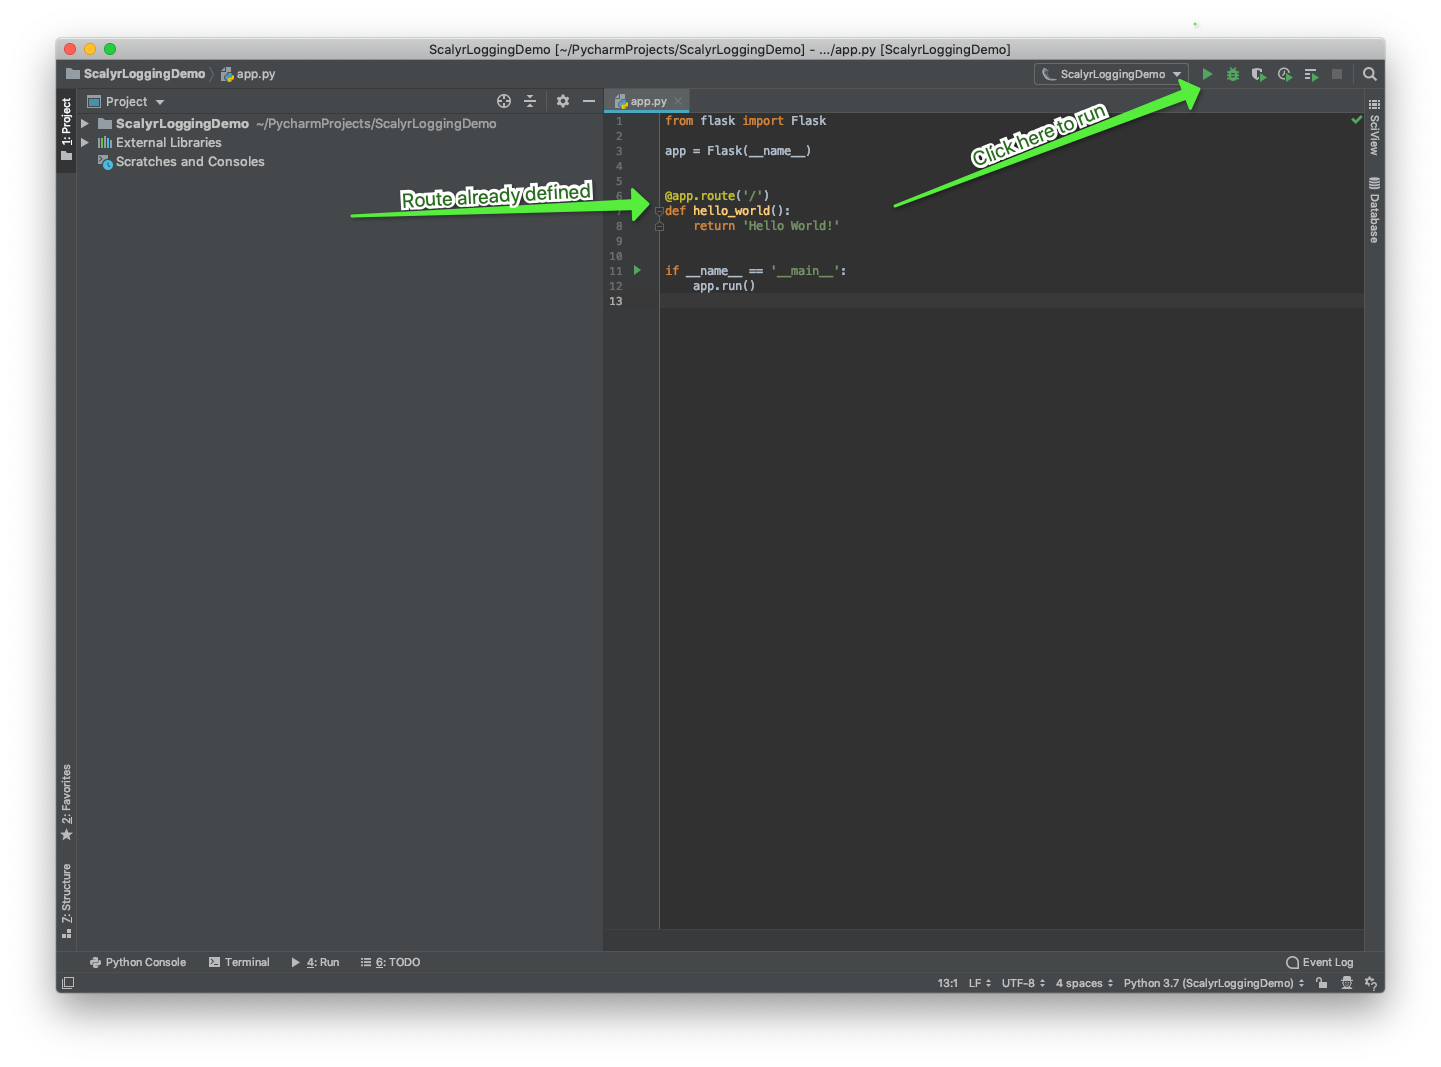
This code responds to a request for ‘/’ with “Hello World.” Click the run button in Pycharm to start the sample application.
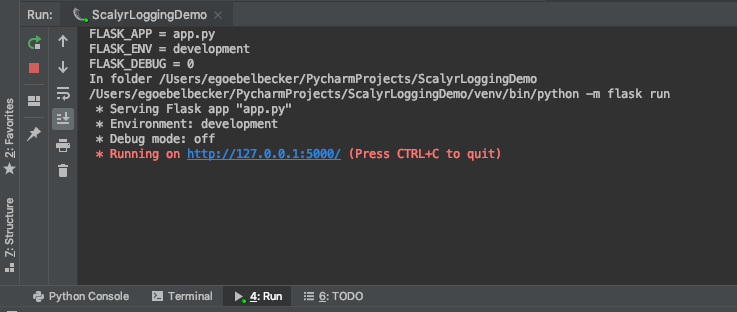
Now that the application is running, make a request. I’ll use HTTPie as a sample client.

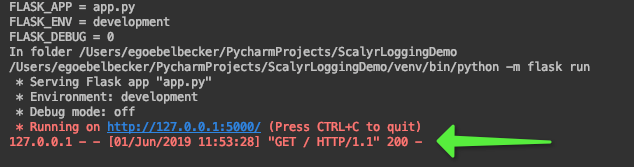
The app responded with “Hello World” as expected. Over in Pycharm, we see that it also logged the request to the console.
Flask runs with standard Python logging. So the minimum for logging in a Flask application is to use the default logger instance it creates for you. Let’s add a log message.
Change the default route to log its entry when it receives a request.
@app.route('/')
def hello_world():
    app.logger.error('Processing default request')
    return 'Hello World!'
Rerun the application and make a request.
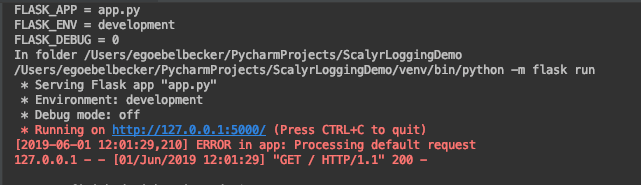
Your log message went to the console.
If you don’t configure logging yourself, Flask adds a handler to app.logger that logs to standard error. This means Python sends log messages to the console immediately, without any buffering. There are several ways to override this. We’ll look at a few after we talk about application logging.
What’s Application Logging?
Let’s discuss what logging is before we improve how your Flask application does it. You’ve dealt with logging before and know what it is, but we’ll define it so we can evaluate Flask’s logging framework in terms of what you need. Way back in the first article in this series, we described what application logging entails as this:
Application logging involves recording information about your application’s runtime behavior to a more persistent medium.
This single sentence has a few moving parts. First, logging records runtime behavior. We use messages to document events inside an application. By mentioning runtime, the definition also implies that logs need a notion of chronological order.
Second, we store logs in a persistent medium so we can review them after they occur, even after the application has stopped. This is necessary because events occur too quickly to follow. If you’re trying to track down an error, a permanent record of events is invaluable. If you need to maintain an audit trail, persistent storage is mandatory. The medium can be a disk, a relational database, or a search platform like Scalyr.
So that’s what logging is. How can you do it more effectively in Flask? Let’s get to work.
The Python Logging Framework
So let’s get back to writing code. One of the reasons for Python’s surging popularity is its extensive standard library. The Flask framework does a great job of taking advantage of this. As you saw above, it supports Python’s Logging framework “out of the box.” You were able to log without even adding an import statement. Let’s change the message we added.
Logging a request as an error seems severe. Knock it down to informational level.
@app.route('/')
def hello_world():
    app.logger.info('Processing default request')
    return 'Hello World!'
Next, rerun the application and make a request.
* Serving Flask app "app.py"
 * Environment: development
 * Debug mode: off
 * Running on http://127.0.0.1:5000/ (Press CTRL+C to quit)
 127.0.0.1 - - [01/Jun/2019 16:48:15] "GET / HTTP/1.1" 200 -
The log message disappeared. Why? Because we logged the message at info level and the default setting is to only log messages at warning level or higher. You need to configure the logger. Let’s look at adjusting the logging level for your application.
Configuring the Logger
Python’s logging module holds four different sub-modules: loggers, handlers, filters, and formatters.
Loggers expose the primary interface that we use to log events from the application. When you use app.logger, you’re using the default logger instance that Flask creates. You could create your own, or even replace the default instance using the logging framework API.
Handlers direct events to the right destination. Using different handlers, you can route events to different files or even direct some to a file and the rest to a different location. Right now, your application is using the default stream handler Python connected to the terminal that the code runs in.
With a filter, you control what log events get written or transform the events. We’re not going to look at them in this tutorial since you don’t need a filter to get started. You can read more about them here.
Finally, log formatters allow you to specify the layout of your messages when the logger writes them. We’ll configure a log formatter below.
You can also configure logging at different module and class levels. This allows us to have finer-grained control over what Python logs and where it puts it. Let’s look at that next.
Setting the Log Level
Let’s get your log message back.
First, add two lines to the Python class. You need to import the logging module so you can call its config method. Then, call basicConfig with the level set to DEBUG.
from flask import Flask
import logging

app = Flask(__name__)

logging.basicConfig(level=logging.DEBUG)

@app.route('/')
def hello_world():
    app.logger.info('Processing default request')
    return 'Hello World!'

if __name__ == '__main__':
    app.run()
Rerun the application and make a request.
* Serving Flask app "app.py"
* Environment: development
* Debug mode: off
INFO:werkzeug: * Running on http://127.0.0.1:5000/ (Press CTRL+C to quit)
INFO:flask.app:Processing default request
INFO:werkzeug:127.0.0.1 - - [01/Jun/2019 17:03:09] "GET / HTTP/1.1" 200 -
The log message has returned! We also see more detail with each entry. By calling the framework’s default config, we’ve overridden some of the defaults set by Flask. Before you customize the log format, tet’s talk about logging best practices. Then we’ll finish up with customizing logging for your Flask application.
Why Log?
Python makes coding easy. Its rich libraries and simple syntax make writing clean code fast and easy. But that doesn’t mean your code is always going to react correctly to unexpected events and anticipate your customers’ every need. You sill need a way to keep an eye on things. Even the best Python applications have bugs and other shortcomings. You need a way to track what’s going on inside them.
Your Flask app is going to drive a web or mobile app. You can’t control the client, but you can use your logs to track your end of each message exchange. Your web service will be used in ways you never dreamed of, and it’ll encounter conditions you can’t anticipate. So when it inevitably fails, you need a way to figure out what happened. That’s where logs come in.
Isolating bugs isn’t the only use for logs either. They’re useful for watching an application that works and finding opportunities for improvement. Maybe you need to start caching the result of a frequent query. And, of course, the usefulness of logs doesn’t stop there. If you’re developing an e-commerce app, you need to track transactional data too.
How Should You Log?
We’ve already managed to add a log message to an application and control which messages are displayed. But the messages seem sparse. They need more context. This leads to a more general question: what information should you log? Most logging systems include at least the following information in each log entry:
- Timestamp: This is when the event described in the log entry happened. We’ll see how to add this to messages below.
- Event context: This is useful information about the event. “It worked” or “It’s broken” might be useful or entertaining during a debugging session. “Failed to connect to database at 192.9.168.3:5000” is more useful in production.
- Severity level: Logs tend to have a level that puts them in context compared to other entries. The Python logger defines **CRITICAL, ERROR, WARNING, INFO, and DEBUG. We’ll take a closer look at logging levels below.
These are only the basics when it comes to logging best practices. Scalyr has an article about logging best practices here. There’s also an excellent cheat sheet here.
Logging to a File
So let’s take care of saving logs to a persistent medium. We’ll send them to a file in the same directory as the application.
Go to your app.py and update the configuration.
from flask import Flask
import logging

app = Flask(__name__)


logging.basicConfig(filename='demo.log', level=logging.DEBUG)
Now run the application and make a request.
(a log file appears.)
Python will create a log file in the root directory of your project. Double click on it to open it in the Pycharm editor.
INFO:werkzeug: * Running on http://127.0.0.1:5000/ (Press CTRL+C to quit)
INFO:flask.app:Processing default request
INFO:werkzeug:127.0.0.1 - - [01/Jun/2019 17:27:29] "GET / HTTP/1.1" 200 -
You have your log messages in a file now.
Formatting Python Log Messages
Now that your log messages are directed to a file, the final step is to add timestamps and context. Let’s start by adding a simple formatter.
Modify the config entry in app.py.
logging.basicConfig(filename=’demo.log‘,
level=logging.DEBUG,
format=’%(asctime)s %(levelname)s %(name)s %(threadName)s : %(message)s’)
Now run the application, make a request, and open the demo.log in the editor again. Python added three new log entries.
2019-06-01 17:41:20,430 INFO werkzeug MainThread :  * Running on http://127.0.0.1:5000/ (Press CTRL+C to quit)
2019-06-01 17:41:25,139 INFO flask.app Thread-1 : Processing default request
2019-06-01 17:41:25,140 INFO werkzeug Thread-1 : 127.0.0.1 - - [01/Jun/2019 17:41:25] "GET / HTTP/1.1" 200 -
Here’s the format string you passed to the logging framework.
- %(asctime)s—A timestamp as a string.
- %(levelname)s—The logging level as a string.
- %(name)s—The logger name as a string.
- %(threadName)s—The thread name as a string.
- %(message)s’—The log message.
Let’s break down the log message you added to the code.
- 2019-06-01 17:41:25,139—This is a timestamp.
- INFO—This is the level you called logger with.
- flask.app—You used the logger instance created by Flask. It’s named **flask.app.**
- Thread-1—Flask creates a thread pool to manage web requests. **Thread-1** handled this request.
- Processing default request—This is the log message.
Python’s logging framework has a rich set of fields that you can add to any log message.
Advanced Python Logging
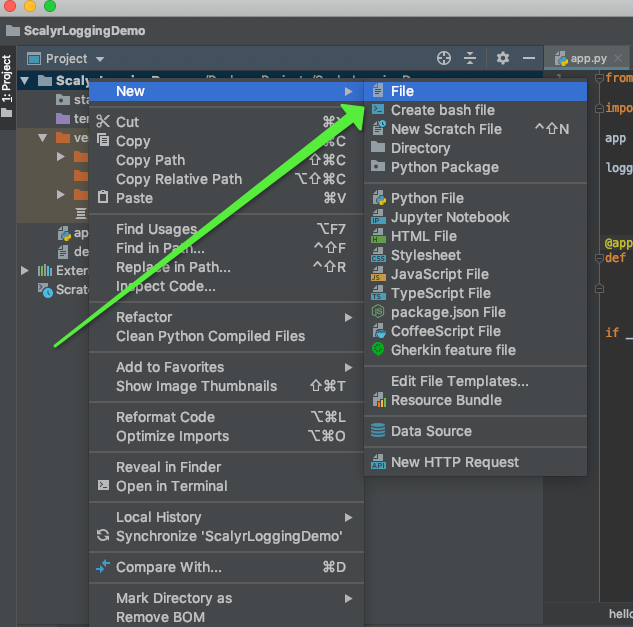
You’ve covered the basics of setting up logging for Flask. But hardcoding your configuration isn’t ideal. Let’s take a look at loading your log configuration from a file to wrap things up. Here is a basic Python logging configuration file.
Create a new file named logging.cfg.

Here are the contents.
[loggers]
keys=root
[logger_root]
handlers=file level=NOTSET
[formatters]
keys=simple
[formatter_simple]
format=%(asctime)s %(levelname)s %(name)s %(threadName)s : %(message)s datefmt=
[handlers]
keys=file
[handler_file]
class=FileHandler formatter=simple level=NOTSET args=(‘demo.log’,)
This creates the same logging setup as you have above.
The first two sections configure the root logger. Like many logging frameworks, Python’s creates a hierarchy of loggers. You have to define a root logger for the system to work. So this configuration creates one that uses the file handler and is set for all logging levels. UNSET means no setting. Any log messages will be passed on.
The formatter is configured with the same format as above. The file handler has the same filename option and is set with its logging level.
Now, load this configuration in the app.
from flask import Flask

from logging.config import fileConfig

app = Flask(__name__)

fileConfig('logging.cfg')

@app.route('/')
def hello_world():
    app.logger.info('Processing default request')
    return 'Hello World!'

if __name__ == '__main__':
    app.run()
Instead of importing logging, import fileconfig from logging.config. Then, load the file with that object.
Run the application and make a request. You’ll see the same entries in the log file. But you can change the log level by editing the configuration instead of your code.
Change the level setting for logger_root to WARNING and rerun the application. No entries will be logged. You can control the log level from the configuration.
What Now?
We’ve covered the hows and the whys of logging with Flask. Like most of the Python standard library, it’s a comprehensive framework that makes logging easy for an application developer. Even though we covered a lot of ground, you still need a logging strategy. Start here, and don’t forget the cheat sheet.
There are many more options for Pythons logger, handlers, and formatters. Play around and see what works best for your Flask application. The Python documentation has a lot of information on the logging module, as well as a basic and advanced logging guide.
Scalyr’s log aggregation tools help you aggregate, process, search, and visualize your logs. This makes it easier to find what you need in the vast ocean of log entries produced by your growing applications. So now that you know the fundamentals, get started with logging in your Flask applications today!