|
|
What is log4net and why would you use it? Log4net is a logging utility for .NET applications. It’s based on log4j, which is for Java applications.
Log4net is highly configurable, so you can use it in many scenarios. You can use it across many different types of apps and write to more than a dozen log destinations, from file to network. But because it’s so configurable, it can be a bit daunting to get things just right.
This guide will walk you through the log4net configuration options. It’ll start by teaching you how to install the framework—don’t worry, it’s a breeze! Then, you’ll learn about the different ways in which you can configure it.
After that, you’ll learn about an important concept: appenders. An appender is a component that effectively writes your log entry to the desired destination. We then cover the many formatting options you have at your disposal, followed by a discussion of log levels. Finally, we’ll teach you how you can use multiple loggers.
It’s going to be a long article. Make sure you’re comfortable and equipped with coffee, tea, or other beverage of your preference. By the end of the guide, you’ll be able to use log4net to log exactly the way you want to.

How To Install Log4net
Log4net comes in a Nuget package and can be added to a .NET project using the NuGet package manager or the following NuGet Powershell command:
Install-Package log4net -Version 2.0.12
Or a .NET Core project using the CLI as follows:
dotnet add package log4net --version 2.0.12
It will install any .NetStandard dependencies along with the log4net library.
Where To Configure Log4net
“Why do I need more than one way to configure my logger?” you may ask.
The answer is simple: As environments evolve, so do their configurations.
Today, you may only need to set up your logger one way: using a web.config (assuming you have an ASP.NET web app on hand). Tomorrow, you might have a farm of web apps that you’d rather configure in a more centralized way.
Besides that, every environment is different and it’s good to have options!
Here are your possibilities for configuring log4net:
- Web.config/app.config: This is the most direct method. You simply add the section in your config file.
- A separate log4net.config file: This approach is great for keeping your main config file clean. But it also lets you do some centralization. Unfortunately, you may have to programmatically watch for changes.
- Programmatic config: While we’re programmatically watching for changes anyway, we might take things a step further and use a database or even a hosted service to control our logger configuration.
Using XML To Configure Log4net
In both the web.config/app.config and a separate log4net.config file, you’ll use XML to write the configuration per se. Let’s see an example of what a minimum configuration using the app.config file could look like.
The first thing you’ve got to do is open your app.config file. Framework versions notwithstanding, it should look something like this:
<?xml version="1.0" encoding="utf-8" ?>
<configuration>
    <startup>
        <supportedRuntime version="v4.8" sku=".NETFramework,Version=v4.7.2" />
    </startup>
</configuration>
Inside the <configuration> tag, include the following code:
<configSections>
    <section name="log4net" type="log4net.Config.Log4NetConfigurationSectionHandler, log4net" />
</configSections>
Then, it’s just a matter of adding the Log4net configuration per se:
    <log4net>
      <appender name="ConsoleAppender" type="log4net.Appender.ConsoleAppender" >
        <layout type="log4net.Layout.PatternLayout">
          <conversionPattern value="%date| %level | %message%newline" />
        </layout>
      </appender>
      <root>
        <level value="INFO" />
        <appender-ref ref="ConsoleAppender" />
      </root>
    </log4net>
Let’s break the configuration above down, covering its parts in more detail.
<appender name="ConsoleAppender" type="log4net.Appender.ConsoleAppender" >
        <layout type="log4net.Layout.PatternLayout">
          <conversionPattern value="%date| %level | %message%newline" />
        </layout>
</appender>
Here we define an appender called ConsoleAppender, which writes to—you’ve guessed it—the console. You’ll soon learn more about appenders. For now, think of them as the components that effectively write your log message to its target.
Inside the appender definition, we set its layout options, which define how the messages will be formatted.
<root>
        <level value="INFO" />
        <appender-ref ref="ConsoleAppender" />
      </root>
</log4net>
Here we define the root logger, assigning the INFO level to it. That means that only messages with a level of INFO or higher will get logged. In the definition, we also assign the ConsoleAppender as the only appender for the root logger.
We could’ve added more, though. For instance, we’ve could’ve added a file appender as well.
After the configuration is done, how do you use Log4Net inside your C# code? First, you must add a few using statements:
using log4net;
using log4net.Config;
Then, you’ll need to get an instance of the ILog interface:
private static readonly ILog log = LogManager.GetLogger(typeof(Program));
After that, it’s just a matter of running the configuration:
XmlConfigurator.Configure();
You’re now ready to log to your heart’s content. Since the toy app I’m creating is a console application, this is what the entirety of my code looks like:
using log4net;
using log4net.Config;

namespace TesteLog4Net
{
    class Program
    {
        private static readonly ILog log = LogManager.GetLogger(typeof(Program));

        static void Main(string[] args)
        {
            XmlConfigurator.Configure();

            log.Info("This is an info message.");
            log.Error("This is an error!");
            log.Debug("This is a debug message that won't get logged!");
        }
    }
}
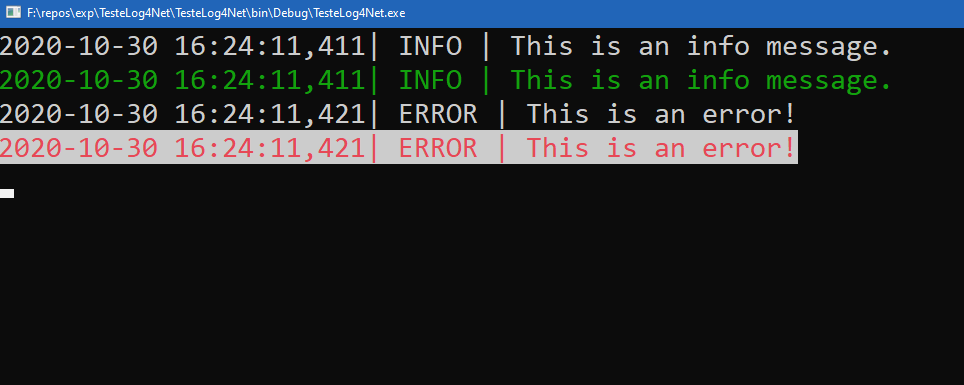
If you run the app, you’ll see the first two messages, but not the third one, because its level is lower than the root logger’s default level.
Configuring Log4net Using C#
As we’ve mentioned, it’s possible to configure Log4net programmatically. Sure, most people tend to prefer configuration via a config file, particularly due to the nice separation between code and configuration. However, since the option for configuring Log4net via C# exists, it’s important that you know it.
So, how do we do it?
You’ll start by adding two new using statements:
using log4net.Core;
using log4net.Repository.Hierarchy;
Then comes the configuration code itself. It could look something like this:
var hierarchy = (Hierarchy)LogManager.GetRepository();

// defining the pattern layout
var patternLayout = new PatternLayout();
patternLayout.ConversionPattern = "%date| %level | %message%newline";
patternLayout.ActivateOptions();

// creating the regular console appender
var consoleAppender = new ConsoleAppender();
consoleAppender.Layout = patternLayout;
consoleAppender.ActivateOptions();
hierarchy.Root.AddAppender(consoleAppender);

// creating the colored console appender
var colorfulAppender = new ColoredConsoleAppender();
colorfulAppender.Layout = patternLayout;

// creating and adding the mappings
var infoColors = new LevelColors()
{
    ForeColor = Colors.Green,
    Level = Level.Info
};

var errorColors = new LevelColors()
{
    BackColor = Colors.White,
    ForeColor = Colors.Red | Colors.HighIntensity,
    Level = Level.Error
};

colorfulAppender.AddMapping(infoColors);
colorfulAppender.AddMapping(errorColors);

// adding the colored appender to the root logger
colorfulAppender.ActivateOptions();
hierarchy.Root.AddAppender(colorfulAppender);

// defining the level and finalizing the configuration
hierarchy.Root.Level = Level.Info;
hierarchy.Configured = true;
I won’t walk you through the code in detail, since it should be easy enough to understand as it is. As you can see, the methods have easy to understand names, and I’ve added comments clarifying the parts of the configuration.
About Appenders
Log4net comes with a plethora of appenders, which take your logged event and send it to your log destination(s). You can have several log destinations for a single logged event.
In your code, however, you only call the ILog method once.
This architecture conforms nicely to the theory of separating code from config. It gives you greater flexibility for choosing your log destinations without changing existing code.
That’s great for anyone, but especially operations engineers who don’t have access to the code.
Let’s take a look at a few categories of appenders and see how you might use each one.
Console Appenders
There are a few types of console appenders to choose from. You can use a colorful appender or a plain one.
With a colorful appender, your console logs will have different colors according to severity. For example, errors will be red, while warnings may be orange or yellow.
This is helpful, but be careful not to rely solely on color to indicate severity.
Colorful appenders won’t work well for colorblind users or those with monochrome monitors. Can you believe I just saw one of those the other day? All logs would be green on that console.
Time for an example. Since you’ve already learned how to configure a regular console appender, we’ll now show you how to configure a colored one. Open your app.config file and add the following code after the closing </appender> tag:
<appender name="ColorfulAppender" type="log4net.Appender.ColoredConsoleAppender">
        <mapping>
          <level value="ERROR" />
          <backColor value="White" />
          <foreColor value="Red, HighIntensity" />
        </mapping>
        <mapping>
          <level value="INFO" />
          <foreColor value="Green" />
        </mapping>
        <layout type="log4net.Layout.PatternLayout">
          <conversionPattern value="%date| %level | %message%newline" />
        </layout>
      </appender>
Here we define a new appender of type ColoredConsoleAppender, called ColorfulAppender. Nothing that different from the previous appender configuration.
Then, things change. We define a new element, mapping. By using it, we can configure colors for a given level.
In the case of the example above, we pick white as the background color and red with high intensity as the foreground color for the ERROR level. We then define another mapping, this time choosing green as the foreground color for the INFO level.
The next step is to add the newly created appender to our root logger. We won’t replace the previous appender. Instead, the logger will have the two appenders, which will cause an interesting result:
<root>
        <level value="INFO" />
        <appender-ref ref="ConsoleAppender" />
        <appender-ref ref="ColorfulAppender" />
</root>
If you now run the app, you’ll see the outputs from both appenders:
File Appenders
A file appender does what it advertises—it writes to a file.
A good rolling log file can then be uploaded regularly to a log aggregation service for analysis and consumption.
This can be done for you by an agent, which will also pull other logs to provide meaningful context. Or you can use an application programming interface (API) to upload logs regularly. The only downside is that you’d be reinventing the wheel.
Here’s a brief example of a configuration for a rolling file appender:
<appender name="RollingFile" type="log4net.Appender.RollingFileAppender">
        <file value="mylogfile.log" />
        <appendToFile value="true" />
        <rollingStyle value="Date" />
        <datePattern value="yyyyMMdd-HHmm" />
        <layout type="log4net.Layout.PatternLayout">
          <conversionPattern value="%date %level %message%newline" />
        </layout>
      </appender>
Event Log Appenders
Event log appenders simply write to the event log. That’s where all the common operating system events are logged, and it’s usually on the system where the event occurred.
Database Appenders
Once you get past writing logs locally, you might consider using some type of database appender. This is great because it allows you to centralize your logs, but you still need a way to read them.
Your logs only realize value when you read and analyze them.
To put it another way, what’s the point of logging if you can’t read what’s logged? It’s the whole point of the activity in the first place. It’s what makes logging valuable!
Network Appenders
Since reading logs is the thing that makes them valuable, why not take it to another level and perform some real analysis on your log data?

For this, you could send your logs to a centralized service.
You’ll want to use one that’s already solved the problems of log aggregation, redaction of sensitive data, searching, graphing, and performance issues associated with massive amounts of log data. All this requires using some kind of network appender.
This is the same kind of network appender you would use if you built an ingestion endpoint over a database that houses your log data.
Notification Appenders
Notification is another common logging scenario. You want to receive some notification about certain events.
However, once you turn on that fire hose, you’ll get bombarded with notifications! Sometimes they’ll stuff your inbox repeatedly with emails about the same error. You don’t need that!
But you do need to know that there’s a problem. So how do you configure these notifications just right?
You want to be notified when there’s a critical system issue, when there are single exceptions of certain types, or when there are multiple exceptions of other types.
And you only need one notification about the same thing over a certain period.
There isn’t exactly a deterministic criterion for when you want an email or a text message, either.
I know I don’t mind a Slack notification or a text message for a critical error. But I prefer not to have my inbox overflowing with emails. And an email is definitely not the way to get my attention for anything that’s urgent.
It’s more appropriate for a gentle heads-up that says, “Hey, by the way, there were some not-very-urgent events logged yesterday. When you get time, you might want to peek at them to see if they require attention.”
This definitely takes some finesse to get right and it’s not probably not the best approach.
It’s better to have a nice user interface with more granular levels of control to set up notifications.
Output Configurations
With so many types of appenders available, you can write your logged events to just about any location.
But what about formatting your logs? And how about using different log levels on multiple loggers?
This section is all about configuring these aspects of your log4net outputs.
Formatting Options
Apache has little documentation on formatting options on their site. But they do happen to have a lot of documentation in the code itself.
Rather than download the code to find out what’s available, you can turn to their rather painful Javadoc-style site to see what you can do.
The exact class that has the documentation is the PatternLayout class.
But rather than having to pore over those details, here’s the gist of it: Use the pattern layout for most loggers. The other layouts are for mapping specific properties to database columns.
Here is a concise rundown of the pattern parameters (e.g., %-10.10utcdate):
Always start with %. %% is an escape sequence for printing the percent sign in your log.
Follow that with optional formatting. The formatting pattern is [-][#][.][#] which is [left justify][minimum width][width separator][maximum width].
Then comes a pattern parameter. The parameters are as follows:
appdomain a thread t
aspnet-cache aspnet-cache{key}
aspnet-context aspnet-context{key}
aspnet-request aspnet-request{key}
aspnet-session aspnet-session{key}
timestamp r date date{format} d d{format} utcdate utcdate{format}

built-in format values: "ABSOLUTE", "DATE", or "ISO8601"    or custom (slower): "HH:mm:ss,fff", "dd MMM yyyy HH:mm:ss,fff" or similar

level p
logger c logger{conversion specifier} c{conversion specifier} property P properties property{key} P{key} properties{key}
message m
newline n
ndc x - stands for "nested diagnostic context"
exception stacktrace stacktrace{level} stacktracedetail stacktracedetail{level} !!!!!!!

THESE ARE SLOW TO RETRIEVE !!!!!!
identity u
username w f
ile F
line L
type class C type{conversion specifier}
class{conversion specifier} C{conversion specifier}
location l method M !!!!!!! T

HESE ARE SLOW TO RETRIEVE !!!!!!
---------conversion specifier---------
A positive integer value such as 1,2, or 3 that's used to specify how many dots in to go. For example, given a class MyNamespace.MoreNamespace.MyClass. %C{1} will print only the class name and %type{2} will output "MoreNamespace.MyClass" specifically.

---------key-------- Whenever you see value that accepts a key, the appender will print all values when no key is supplied. If you set a key, %property{applicationName} for example, it'll only print the value for that key.
There are some things to note about the format values. For example, some shorthand values are uppercase and others are lowercase.
Please use extra caution when using these! Lowercase p is “logger,” while uppercase P is “property.”
Properties
A property comes from either the event, the thread, or the global context. Properties on the event are set by either the logger or the appender.
The way to set these is by setting them on the context or event as follows:
log4net.GlobalContext["applicationName"] = "MyApp";
log4net.ThreadContext.Properties["userName"] = "MyUser";
log4net.ThreadLogicalContext.Properties["userName"] = "MyUser";
log4net.Core.LoggingEvent["className"] = "HomeController";
When you add properties this way, they’re available to the appender.
Formatting Example
It would be helpful to see an example of a log format string. Here’s one that’s a bit extreme, but it shows how many of the format tokens can be used:
<log4net>
  <appender name="Trace" type="log4net.Appender.TraceAppender">
    <param name="applicationName" type="string" value="MyApp" />
    <layout type="log4net.Layout.PatternLayout">
      <conversionPattern value="%utcdate %p [%t] %c{2} [%P{applicationName}] - \
                                %-10.10m%n%aspnet-request{ALL_HTTP}%n%aspnet-session%n%stacktracedetail \
                                %F %l %L %C %M%n" />
    </layout>
  </appender>
  <root>
    <level value="ERROR"/>
    <appender-ref ref="Trace"/>
  </root>
</log4net>
The conversionPattern value has the format string for the log entry.
I’m using a TraceAppender, which writes to the debug output window in Visual Studio. You’d think the OutputDebugStringAppender would do that, but it doesn’t.
Next, let’s go over how to set log levels.
Log Levels
You can set different log levels for various loggers and filter events per appender.
Here’s a sample configuration in a web.config that uses different appenders to log appropriate levels of information for each log level:
<log4net>
      <root>
          <level value="ALL"/>
          <appender-ref ref="Trace"/>
          <appender-ref ref="InfoFile" />
          <appender-ref ref="FatalSmtp" />
      </root>
      <appender name="FatalSmtp" type="log4net.Appender.SmtpAppender" >
          <filter type="log4net.Filter.LevelMatchFilter">
              <levelToMatch value="FATAL"/>
          </filter>
          <to value="[email protected]"/>
          <from value="[email protected]"/>
          <subject value="FATAL EXCEPTION IN APPLICATION!"/>
          <smtpHost value="localhost"/>
          <port value="25"/>
          <layout type="log4net.Layout.PatternLayout">
              <conversionPattern value="%utcdate %p [%t] %c{2} [%P{applicationName}] -
                                 %-10.10m%n%aspnet-request{ALL_HTTP}%n%aspnet-session%n%stacktracedetail
                                 %F %l %L %C %M%n" />
          </layout>
      </appender>
      <appender name="InfoFile" type="log4net.Appender.RollingFileAppender">
          <filter type="log4net.Filter.LevelMatchFilter">
              <levelToMatch value="INFO"/>
          </filter>
          <file value="info.log" />
          <appendToFile value="true" />
          <maximumFileSize value="100KB" />
          <maxSizeRollBackups value="2" />
          <layout type="log4net.Layout.PatternLayout" >
              <conversionPattern value="%level %thread %logger - %message%newline" />
          </layout>
      </appender>
      <appender name="Trace" type="log4net.Appender.TraceAppender">
          <param name="applicationName" type="string" value="MyApp" />
          <layout type="log4net.Layout.PatternLayout">
              <conversionPattern value="%utcdate %p [%t] %c{2} - %-10.10m%n%aspnet-request{ALL_HTTP}%n" />
          </layout>
      </appender>
  </log4net>
It can be a bit much to digest, but basically there are three appenders:
- FatalSmtp: Sends an email on fatal exceptions only. The body of the email will have an exquisite amount of detail about the exception. CAUTION: This is for demonstration purposes only. That amount of detail in an email could expose sensitive information.
- InfoFile: Logs to a file. Each entry has just a little information.
- Trace: Writes a decent amount of information to the output window or whatever is listening to the trace.
As you can see, it’s fairly simple to partition your log destinations by a number of factors. It’s also easy to set up multiple loggers.
Let’s look at that next and then wrap it up.
Multiple Loggers
When we use the log4net LogManager class to get a logger, we have to specify which logger we want.
By default, the root logger is returned every time. But we can override this behavior any time if we prepare in advance.
The common practice is to pass the type to the GetLogger function as follows:
Ilog log = log4net.LogManager.GetLogger(typeof(HomeController));orIlog log = log4net.LogManager.GetLogger(typeof(Controller));
When you pass the type, it simply uses the namespace and type for the logger name. If you’ve defined a logger that matches the type, it returns that logger. Note that all loggers inherit from root.
This is a powerful feature!
Because you can define loggers in your configuration, you don’t have to change code to use a different logger for different purposes.
Let’s say you’re using ASP.NET WebAPI with a database-backed API. You’ll have a bunch of controllers and some data access methods.
You can reference the Controller base class for your controllers and an IRepository base for your data access classes.
And, when you want to change the way you log the data access only, it’s a simple matter of defining a logger with the name of that type.
Here’s a quick example of what I mean:
namespace Models
{
    internal interface IRepository<T> : IRepository
    {
        User[] Get();
    }

    internal interface IRepository
    {
    }
}
namespace Controllers
{
    public class HomeController : Controller
    {
        private readonly ILog log;
        private readonly IRepository<User> repository;
        public HomeController()
        {
            // note the logger name == "Controllers.HomeController"
            log = LogManager.GetLogger(GetType());

            // note the typeof logger == "Models.IRepository"
            repository = new UserRepository(LogManager.GetLogger(typeof(IRepository)));
        }

        public ActionResult Index()
        {
            try
            {
                User[] users = repository.Get();
                return View();
            }
            catch(Exception ex)
            {
                log.Error(ex);
                throw;
            }
        }
    }
}
Since the repository class has a logger with the name Models.IRepository and the controller has its own logger, we can do different things with each one.
For example, we can set the repository’s logger to log information about the database calls and the controller to log more general information.
You can also notify different people depending on whatever criteria you need. The possibilities are endless!
Wrap Up and More Information
Because log4net is so configurable, it helps write your logging code to take advantage of this. Later, you can reconfigure your log outputs without changing the code. With the information in this post, you’ll be able to be a productive user of log4net.
Where should you go from here? Well, the correct answer is always education. And, as luck would have it, you’re in the right place for learning more about logging.
If you want to read more, Scalyr has more posts on log4net, which contain more useful information to help you on your logging journey. Check out this post on getting started quickly logging with C#, or this one about what to look for in a logging framework.
After learning more about log4net and logging in general, a good next step is learning about available tooling that can either improve your logging approach or help you extract valuable insight from your logs.
Scalyr is one such tool. It’s a log management solution that helps you collect, parse and analyze your log entries from many different sources. It then offers you useful functionality, such as super-fast search, alerts and notifications, and log visualization.
To send your log4net logs to Scalyr, you can use a Scalyr Agent to gather them in batches and upload them to your account. Give Scalyr a try today.